

- By
- September 24, 2025
In this article, we’ll discuss the methods to build a free SMTP server using postal. We’ll list some of the free, open-source software or email marketing tools. You’ll also find out how to set up a free SMTP server using postal and fully-featured open-source mail.
In this process, we will use postal, a free delivery platform, because it has many outcomes providing all the tools and features to set up a free SMTP server to send unlimited emails.
You should use the postal because of the following consequences:
SMTP stands for “Simple Mail Transfer Protocol,” is the medium, which specifically triggers the process of email deliverability with full care.
Actually, this article is not about what an SMTP server is but if you really want to know about an SMTP server then go to the link below.
What is SMTP server? complete detail 2021
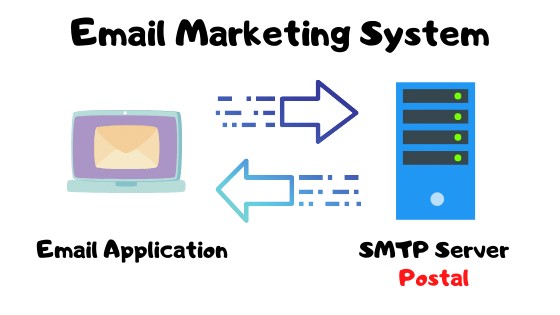
The SMTP server is a delivery agent responsible for delivering each email through the medium (internet) with full care. But in contrast, it has the authority to pass or deny the delivery of emails over the internet; therefore, first of all, you have to configure the right SMTP setting and addresses. Besides, every marketing email system works with agents:
The sender: which allows you to send an email over the internet.
The management application: its function is to arrange, monitor, and analyze the consequences and manage your mail server later.
To run the marketing system, we need both to work simultaneously and properly. Meanwhile, for email marketing, you need to send unlimited emails without any restrictions by companies or monthly plans, or others.
Now, get ready to build a free SMTP server. I’ll show you how to how to set up the server step by step.
To build the Server, you need two things:
If you are ambitious to send an email then first you have to select an email domain like this one:
mail@servicesground.com
In the above email, you can see the “servicesground.com” is the domain. The same kind of domain you are required to send an email from your SMTP server.
Usually, the website domain name should be used but in case of a cold email campaign, you should avoid using a business domain to keep it safe from the blacklist. If you don’t have any domain then you have to get it first to continue the setup.
How to get a domain?
There are a lot of DOMAIN REGISTRATION PROVIDERS to get a domain and it cost just 10$ per year.
You can get a domain from:
The second thing you require to setup SMTP is a VPS server.
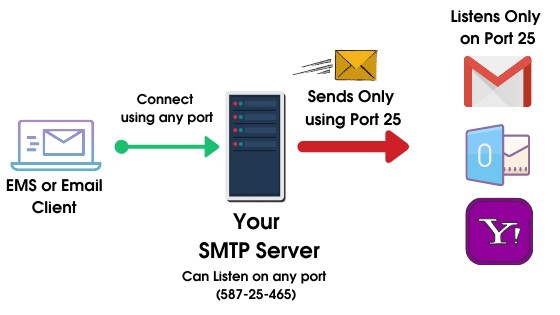
If you don’t have a VPS server then first, you’ve to buy it from the Web hosting or Cloud Services Company, available for public with a public IP. The function of the VPS server is to drive the website efficiently and then run the machine in the cloud to do the desired tasks. After getting the server make sure that its port 25 must be opened because through this port server can communicate over the internet.
Examples
In computing, all servers have a firewall running which then blocks all the ports except the one you need. To use a certain port you need to open that port in the firewall. Basically, a firewall is the network security system that controls the traffic moving over the internet by creating a barrier between the trusted and untrusted network. How the firewall works the following diagram will clear your all doubts.
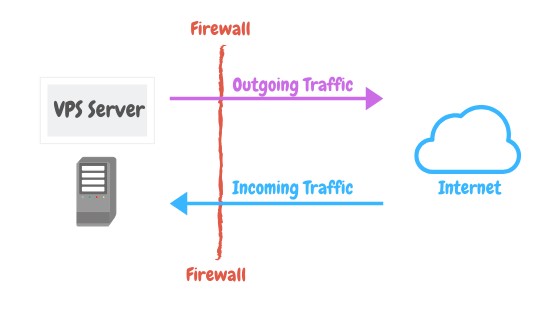
After getting the server make sure that port 25 is allowed by the company because some companies block this to protect from spammers used to send emails.
Here is a list of some companies that allows port 25.
You can also start with (Contabo) which is the cheapest VPS service or sign up on the (DigitalOcean) which offers 100$ in order to test everything.
After selecting the VPS Company, create a VPS server according to the following specification:
Now get ready to prepare the VPS server step by step. Using an SSH client like putty or bitwise make a connection with your server.
hostname –f sudo hostname host.domain.tldsudo hostname postal.example.comAs you set your VPS server & its domain name, subsequently go to the domain provider and map it to the VPS server. Then open the DNS management zone and add a new record to it like this:
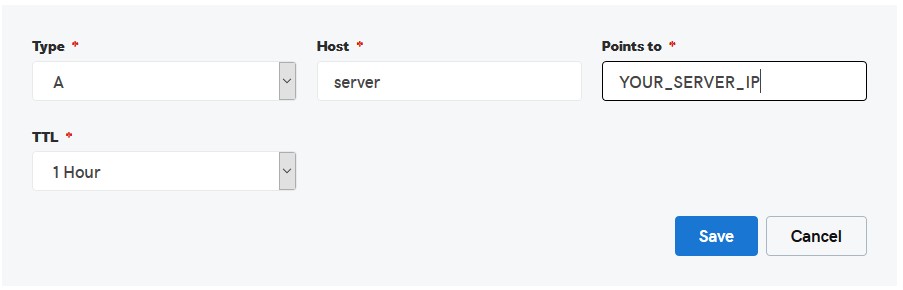
In this article I’ll use server and you can choose whatever you want
If the VPS is ready then you can start the installation process so, for this, you have to install SMTP software.
You can have several SMTP software like PowerMTA, Postal, Exim, Postfix, or other suitable for you. But we’ll use Postal as our SMTP software in this tutorial. As you know, we have selected Contabo so, we’ll need to run the following command before initiating the process:
sudo apt-get install apt-transport-httpsTo Install Postal, simply run this command on your server:
curl https://raw.githubusercontent.com/atech/postal/master/script/install/ubuntu1604.sh | shNote (this is one command line, so copy all and paste in putty and press enter)

In the installation process, you don’t need to do anything because the setup is fully automated. Just wait a couple of minutes for the process to complete.
Once it is done, you’ll receive the notification “installation complete”.
Now create a user to login and manage your postal server through the web interface. Simply run the following command
postal make-userAfter this, you’re required to enter your name, email, and password. Then press enter after putting the required data in the input.
Now you’ve installed the postal.
Configure Postal SMTP
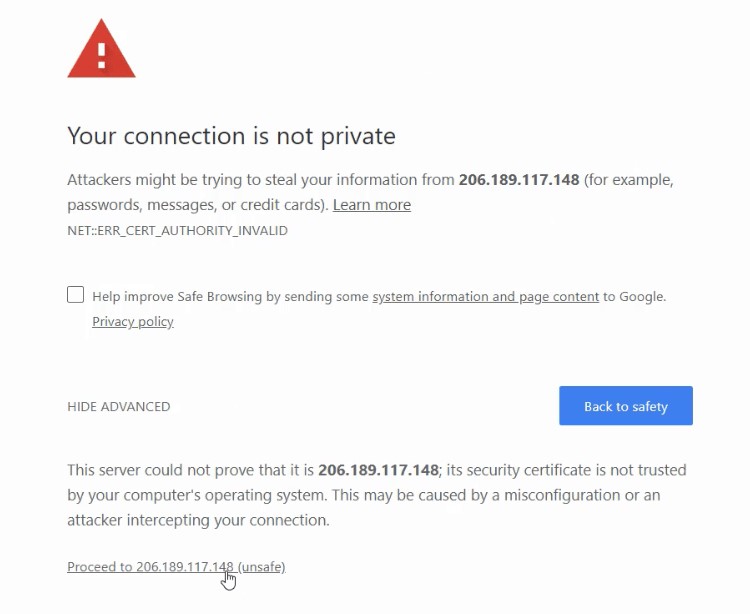
After the installation, open the internet browser and navigate to your server IP URL or Subdomain like this:
https://Sg-educate.comAfter this, you will get an SSL warning. It’s ok! Just click on “proceed” as you can see in the image given below:
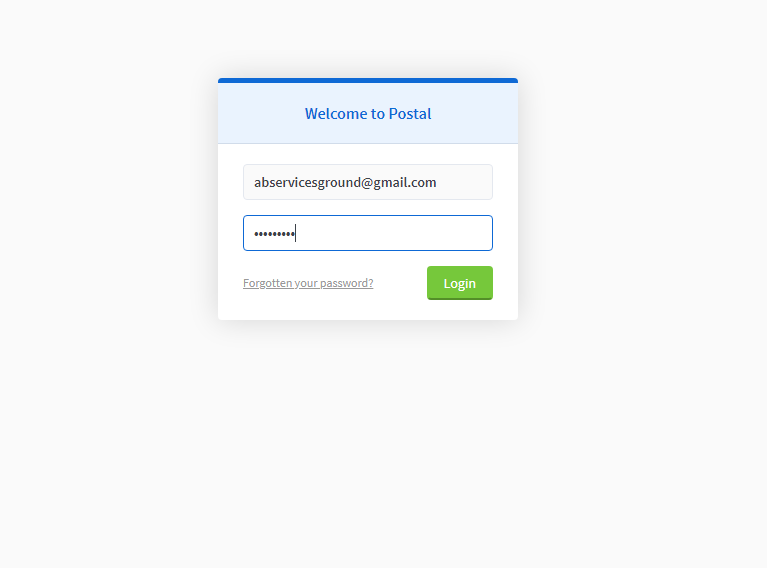
And then you’ll see the postal login screen where you’ve to enter your email & password that you created during the setup.
After getting inside the postal click “Add Organization” to add one. Then you will see the “Build Server” on the lower-left corner click on it and set it to live mode.

Now you will see the “Add your first domain” so click on it and add your domain name into postal.

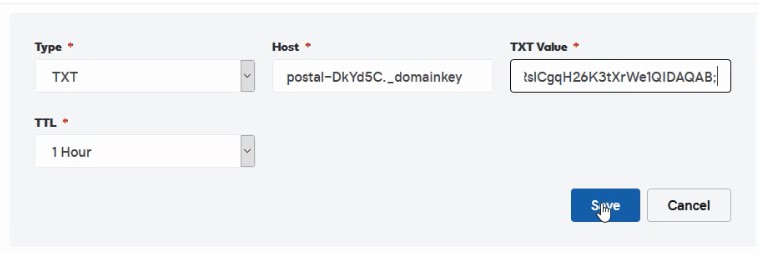
Simply, enter your domain name to send emails and click “Create Domain”. Then you’ll see the Domain page with the records that you need to fill.
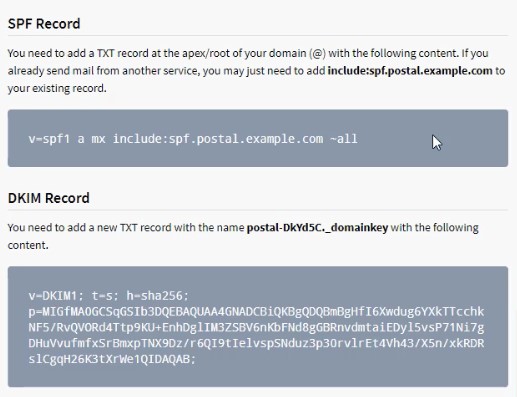
Simply, copy these records from SPF & DKIM and then paste them in the DNS Zone. Now your server is ready to send emails!
But what are SPF and DKIM?
As you can see in the above image there is a DKIM record mentioned so whatm. is this? This a text record in your DNS and its function is to hold a public authentication key. Later it will protect your email originality and this is very important for your server.
The good thing about Postal is that DKIM is already configured and its keys are also generated. You just have to copy the DKIM record in your DNS Zone.
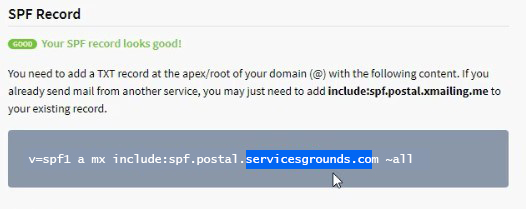
An SPF is also a text record added to the DNS zone, and it specifies the mail servers authorized to send an email for your domain. The message or email will be marked as spam if the server isn’t authorized or allowed by the SPF record.
For example: if you try to send an email from a Google domain like mail@google.com then your email will be marked as spam because you can’t use the google domain.
You can also configure SPF and prevent from others try to send an email from your domain. So, SPF configuring is very important to make your domain trustable for other mailing service providers.
v=spf1 a mx ip4:XXX.XXX.XXX.XXX -allNow, only your server is allowed to send an emails from your domain.
If you noticed, there is an SPF example given by the postal and that looks like:
v=spf1 a mx include:spf.postal.example.com ~allYou have to change the example domain and configure file in the postal to match your domain.
First, you’ve to connect the server to edit the postal configuration file, use a file manager to connect with your server. There is a WinSCP a free remote file manager used to connect or edit configuration files.
It is simple and easy to use:
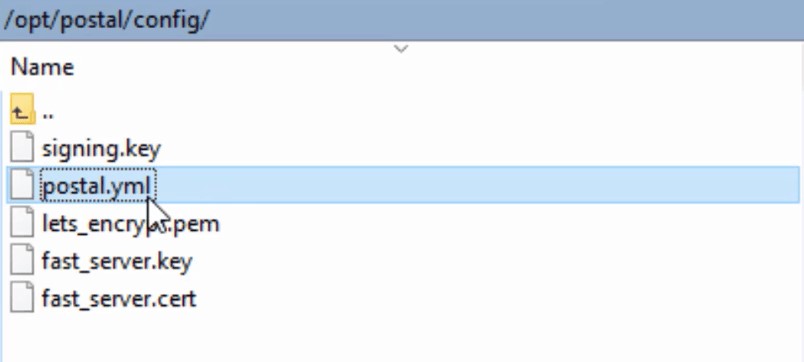
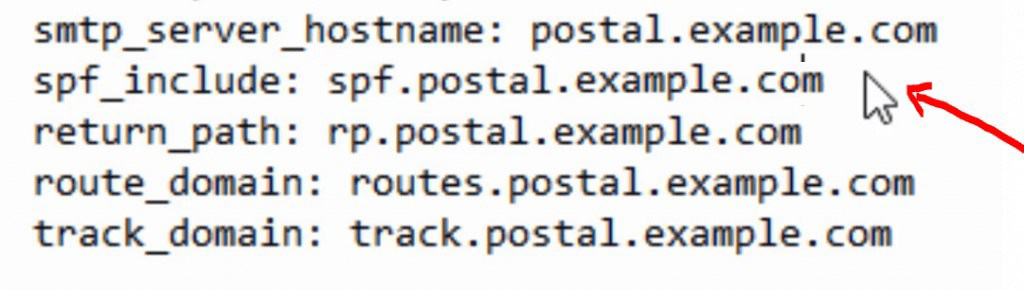
After replacing the example domain with your domain name you need to restart postal so that the configuration comes in action.
So run this command on your server:
Postal restartSo, when you refresh your web page the example.com will change into your domain name.
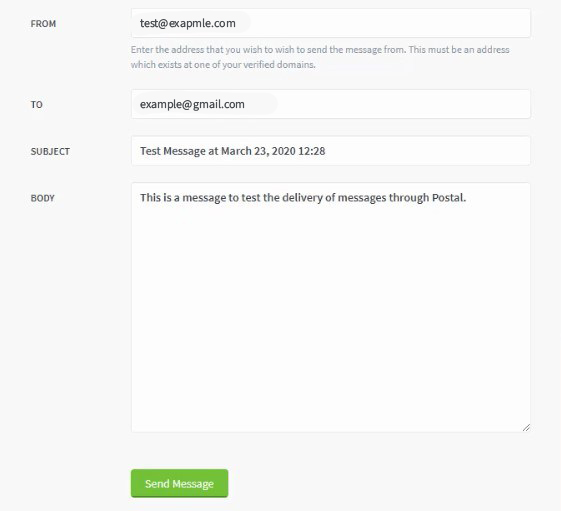
Now postal is ready to send testing emails so, click on the messages and then click on the send messages to test the free SMTP server.
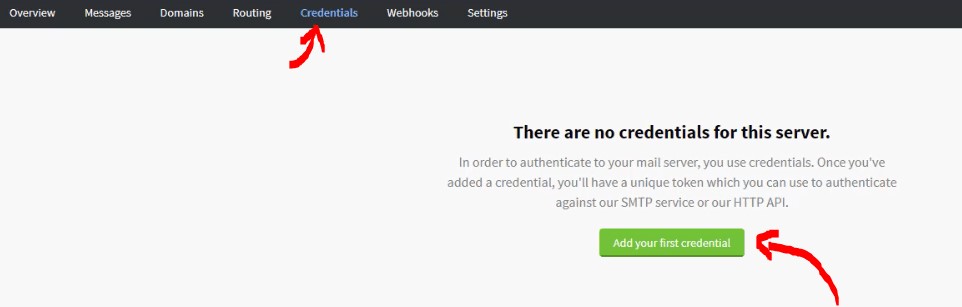
If you’ve worries regarding the use of SMTP to send emails then don’t be panic, all you just have to create credentials inside the postal to connect with the free SMTP server.
Create Postal Credentials to Relay Emails
Simply, click on Credentials, then Add your first Credentials.
In type (input): select SMTP. But if you don’t want to connect postal through SMTP then you can select API to develop your own application.
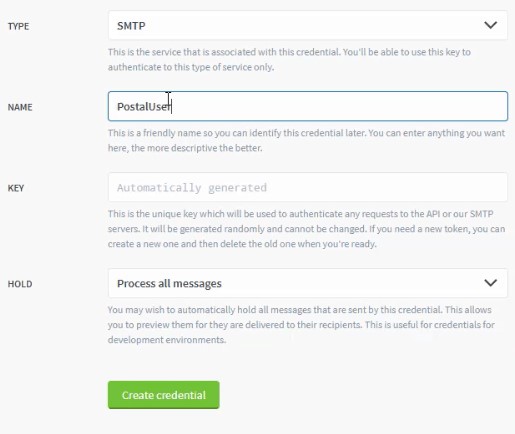
And the process is done here, now you can use these credentials in any email marketing.
Simply, Go to SMTPER.NET and enter your server details as follows:
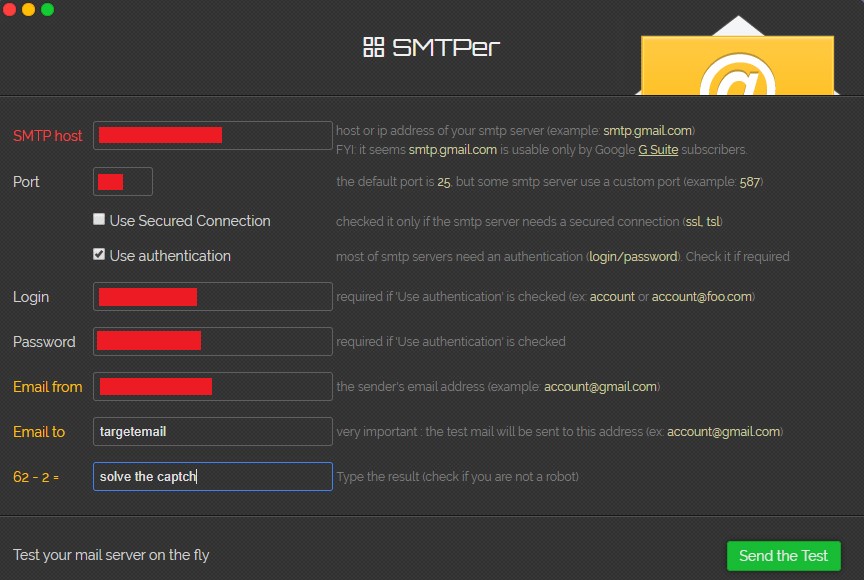
Test your SMTP here:
You can use these credentials in Email Sender application.
Before sending an email, you’ve to keep some crucial concepts in your mind. So, follow these guidelines to get the best delivery rates.
Before starting your email marketing campaign, warm-up your IP Address. Because it’ll build your reputation on the internet and increase your volume of mail sent according to schedule.
It is important because when your IP Address is brand new in the competitive environment, it has no reputation on the internet and no one knows about this IP Address. So, the IP warmup is basically the practice to build a reputation on the internet.
Example of warming up your server shown in the table below:
| Warmup Day | Emails To Send |
| 1 | 20 |
| 2 | 50 |
| 3 | 100 |
| 4 | 300 |
| 5 | 500 |
| 6 | 700 |
| 7 | 900 |
| 8 | 1000 |
This Table shows a scenario, if your target is 1K emails per day with the good reputation.
The reverse DNS is also known as a pointer record. It is used to point your IP to your Domain and it works contrary to regular DNS.
RDNS is the essential element in your mail server and increasing your sending score. It will also improve your reputation on the internet. So, when you’ll search the IP you will get the name.
It is basically the protocol used to monitor the authenticity of email messages using SPF & DKIM. DMARC has made it easier for ISPs (internet service providers) to prevent malicious emails. It allows the email senders to handle unauthenticated emails by using SPF or DKIM records. The sender can whether move the unauthenticated emails to the junk folder or can block them all.
MX (Mail Exchange) records are DNS records responsible for delivering email to your address. In simple words, Max record tells the world about the mail servers which allows incoming traffic to your domain and the route of the sent email.
Four factors can determine the spam scores, given below:
We have already discussed the first two factors above but there is still Message Body and Email List Health.
In this factor, the health of the email matter the most. The subject line and the content of the email should be attractive and professional. If the email looks spammy, then the recipient will not get your email and your email will directly move to the spam folder. So, avoid using spammy words & triggers.
The health of the email list is determined by the following two things:
SSL certificates encrypt the traffic between the server and client to provide extra security for users to access your application. It provides an easy way to install trusted certificates for free. Connect it to your server using putty SSH client. Get ready to install!
Let’s Encrypt client certificate are installed through client software running on your server.
The official client is called Cerbot which is installed by running this command:
apt -y install certbotThe second step is you need to stop Nginx service because it is using port 80 which will be used by Cerbot. So, stop this service temporarily by running the following command:
sudo systemctl stop nginxNow install the certificate by running the following command:
certbot certonly --standalone -d postal.example.comReplace the following domain with your domain. And then follow the Wizard. The Cerbot will issue you the certificate for your domain.
Now you’ve got a free SMTP server but you need to configure it in your server. So, start the Nginx service again by running the following command:
sudo systemctl start nginxserver {
listen [::]:80;
listen 0.0.0.0:80;
server_name postal.example.com;
return 301 https://$host$request_uri;
}
server {
listen [::]:443 ssl;
listen 0.0.0.0:443 ssl;
root /opt/postal/public;
server_name postal.example.com;
ssl_certificate /etc/letsencrypt/live/postal.example.com/fullchain.pem;
ssl_certificate_key /etc/letsencrypt/live/postal.example.com/privkey.pem;
ssl_protocols TLSv1.2 TLSv1.1 TLSv1;
ssl_prefer_server_ciphers on;
ssl_ciphers EECDH+ECDSA+AESGCM:EECDH+aRSA+AESGCM:EECDH+ECDSA+SHA512:EECDH+ECDSA+SHA384:EECDH+ECDSA+SHA256:ECDH+AESGCM:ECDH+AES256:DH+AESGCM:DH+AES256:RSA+AESGCM:!aNULL:!eNULL:!LOW:!RC4:!3DES:!MD5:!EXP:!PSK:!SRP:!DSS;
location / {
client_max_body_size 50M;
try_files $uri $uri/index.html $uri.html @puma;
}
location /app/assets {
add_header Cache-Control max-age=3600;
}
location @puma {
proxy_set_header X-Real-IP $remote_addr;
proxy_set_header Host $host;
proxy_set_header X-Forwarded-For $proxy_add_x_forwarded_for;
proxy_set_header X-Forwarded-Proto https;
proxy_pass http://127.0.0.1:5000;
}
}systemctl restart nginxsystemctl enable nginxThanks for reading
I am a committed digital marketer that is passionate about developing effective internet tactics. I’m dedicated to generating quantifiable outcomes and assisting businesses in thriving in the digital age by employing an extensive collection of SEO, social media, google ads and data analytics.